Friday, October 29, 2010

Homemade Coconut Dark Chocolate (Gluten free, Dairy free, Soy free, Sugar free)

So I know you have all been waiting with baited breath. I told you I was going to reveal to you today what I used my coconut butter for. Are you ready? I used it to make homemade coconut dark chocolate. If that doesn't make your mouth water, I don't know what will.

It was a work in progress that took a few days. But I definitely learned some things along the way, and I will share with you what I learned.

I based my first attempt off of a recipe I found on the internet. I used the double boiler method by placing a bowl with the ingredients over a pan of simmering water. The three components are cocoa powder, coconut oil, and sugar (I used stevia instead). Once they were melted and mixed together I tasted it and it was bad. I don't know if it is because I used the Hershey's Dark Cocoa Powder but it was chalky and nothing like the creamy chocolate I was looking for. I thought pouring it into a pan and letting it solidify would help things and they didn't. It just tasted like chalk in solid form. Part of the problem was the sweetener didn't mix in very well and cocoa flavored coconut oil wasn't very appetizing.

So I put it in a container and let it sit for a few days while I thought about what I could do to save it from being thrown away.


 This is where the coconut butter comes in. I thought that in order to achieve that creamy dreamy texture I needed something with more substance that would also keep the sugar incorporated throughout.


So I pulled my chalky chocolate out of the fridge and threw it into the blender with my coconut butter. I also was making hot sauce from a bunch of cayenne peppers that came into my possession in the blender on the right. But that is another story for another time. The important thing was that there was no cross contamination. Spicy chocolate is not my thing.


I poured the mixture into a wax paper lined pan and let it harden in the fridge for about 2 hours.
Then came the moment of truth. I placed it on a cutting board, peeled of the wax and broke off a chunk to taste... and what met my taste buds was pure ecstasy. To me it is the perfect dark chocolate. It was creamy, you got a hint of sweetness that balanced the bitter dark chocolate, and finished with a dreamy coconut overtone. I used a knife and chopped it into little chunks and placed it in a airtight container. I think you could keep it at room temperature but if your kitchen gets warm from lots of cooking it will melt into a big blob that is hard to deal with. So I would recommend storing it in the fridge or freezer. But honestly, I don't think it will last long enough to matter :).


Homemade Coconut Dark Chocolate (Gluten Free, Dairy Free, Soy Free, Sugar Free)
1 cup Coconut Oil
1/2 to 3/4 cup Dark Chocolate Cocoa Powder - I used 3/4 cup and it was more on the bitter side, but I like that!
1 1/2 tsp Stevia (I used 3 packets)

Find a heatproof bowl and a pan that will fit under the bowl for your double boiler. Fill the pan halfway with water and bring to a simmer. Place all ingredients in the bowl and place over simmering water. Stir as it melts. Once it is melted, pour into a wax lined 8x8  or 9x13 pan, depending on desired thickness. Let chill in fridge for several hours and break apart or chop into desired size. Eat immediately or store in fridge or freezer in an airtight container.

This post is a part of Fight Back Friday at Food Renegade.

I also have one quick announcement. I am leaving in about an hour to fly down to Mexico for ten days. I will be visiting my twin sister who lives there as a missionary. I am more than thrilled to have the opportunity to go and spend some time with my twin who I only get to see once a year! I know we will have a busy schedule, so I am not sure if I will be able to update. But once I get back I will definitely share lots of pictures and stories! 


Thursday, October 28, 2010

Homemade Coconut Butter

Have you ever heard of coconut butter? Essentially you take shredded coconut and puree it until creamy. You can use it as a condiment for anything you want to taste like coconut. You can put it on oatmeal, spread on a baked sweet potato with a dash of cinnamon, on muffins, pancakes, cornbread, etc... The uses are endless. I am a coconut lover, and so this stuff is practically gold :).

I have never bought it from the store because of the high price tag. The cheapest I've seen it was $11.99 for a 16 oz. jar. That being the case, I can't tell you how the taste of my homemade stuff compares to store bought coconut butter. I can tell mine is a little gritty, but that doesn't really bother me. Also, after knowing how much I can save by making it at home, I will never look back.

To figure out savings I found that the cheapest store bought coconut butter is $11.99 for 16 oz. According to my measurements I can get 16 oz. of homemade coconut butter from 6 cups of shredded coconut. Then I found a site where I can buy 1 gallon/3.5 lbs. of shredded unsweetened coconut for $16.99. So, 16 oz. of homemade coconut butter would cost $4.85. That is a whopping savings of $7.14.

If you want to try it, here are some pictures to walk you through the process. All you need is a food processor, some unsweetened shredded coconut and a little patience. Oh and a spatula would be good for the necessary side 'scrapage'.


I poured 2 cups of coconut in the the food processor and let it blend for about 3 minutes. 


Eventually it will start to clump up a bit and you will need to take off the lid and scrape down the sides. Let blend for another minute or two.


At this point it is almost to the creamy stage and you will need to scrape down the sides pretty often.  Be patient and just keep scraping and blending and eventually it will look smooth and creamy.


After it gets to this point I let it blend for another 2-3 minutes to get it as smooth as possible. My most recent batch with 2 cups of coconut resulted in a heaping 1/2 cup of butter. Use right away, or store in an airtight container for later. There is no need to put it in the fridge. A cool dark place will be fine, and just like coconut oil it solidifies at room temperature. 

Tomorrow I will tell you how I used my coconut butter :).

This post is a part of Simple Lives Thursday hosted by GNOWFGLINS.

Tuesday, October 26, 2010

Easy as Baked Kale

I wanted to go grain free today and see how I feel. For breakfast I had homemade chicken broth with turmeric and collard greens. I know that that is not a normal breakfast, and there are many that would never eat it even if it wasn't for breakfast. But, I have gotta say it gave me energy and didn't leave me craving more carbs. I had raw pumpkin seeds as a snack a few hours later.

 For lunch I made a big scramble with 2 cups spinach, 6 mushrooms sliced, 2 eggs and spaghetti sauce over the whole thing.


I made myself a big plate of baked kale chips to go on the side.
For one serving I used 4-5 kale leaves with the center stem pulled out and the leaves torn into large chunks. Remember that they shrink when baked.


I seasoned them with salt and pepper, and placed them in a toaster oven preheated to 400 degrees. It takes between 10 and 15 minutes but be careful because they burn easily! I walked away for too long and came back to a few burnt chips.


It was a great lunch and just like breakfast it gave me energy and didn't leave me feeling like I needed to eat everything in the fridge. I might try to do grain free days more often. 

Do you find that eating grains make it hard for you to use portion control sometimes?


Procrastination and a few rambles

I just finished eating lunch and I am supposed to clean the house. But, I don't particularly feel like it right now. Instead of getting up and doing it anyway, I sat down to start catching up on all the blogs I am subscribed to. Then I decided that if I am sitting down and procrastinating, I might as well do something a tad more productive and write a post.

I was going to write about my attempt at homemade chocolate. But then it turned out tasting terrible. I need to make some adjustments before I can recommend any recipes. Instead I will tell you about yesterday's dinner.

About six months ago my husband and I went to an italian restaurant for dinner.  He ordered Gorgonzola Alfredo with Steak and Mushrooms and liked it so much he requested it for his birthday. His birthday was yesterday, and I remembered that dish and prepared it for dinner last night. He grilled the steaks outside, and I used spinach linguine, a homemade alfredo sauce with gorgozola mixed in, and added sauteed mushrooms and spinach. I wasn't planning on having any because wheat and dairy sometimes give me a hard time. But I used a half serving of noodles, piled on the mushrooms and spinach and only used about 2 Tablespoons of the sauce. I also ate a large salad with it, and my stomach was fine. It tasted great, and I was glad to be able to enjoy it! I didn't realize how simple alfredo sauce is and how much better it tastes when it is homemade. Chris was pleased and it made him feel special that I remembered his request from so long ago. We also don't eat much dairy or red meat around here so it was a treat on many levels.

I also made fifty cupcakes to take as birthday snack for his 6th grade band class. It was funny because I had never met any of his band students before and some of the things they said when they saw me made me laugh. The third girl in line that I gave a cupcake to looked at me and said "So you are the teacher's wife?". I responded in the affirmative and she said "Wow, you're kind of pimp". I probably wouldn't use that word to describe myself but I thought it was a compliment nonetheless. It makes me feel good knowing that the middle schoolers here think I am cool.

I guess it really is time for me to go clean now. I will post later with pictures from lunch. It was tasty.

Saturday, October 23, 2010

New Ideas and New Adventures

I have been thinking a lot about what I want my focus to be on this blog, and I have an idea.

Right now my husband and I are on a tight budget. We are trying to spend as little as possible and save as much as possible. We are saving to put me through school, as well as saving for a down payment on a house. Those are some pretty big things and we are trying to be as proactive as possible when it comes to cutting costs. 

For example, we recently turned off cable to cut bills, our grocery budget per month is $200, I only go grocery shopping twice a month with a planned menu and list of things to buy, I rarely buy clothes new, etc.. 

My idea is to blog about saving money while still incorporating all the things I am interested in. I want to live out the reality that we can eat healthier, live better, be greener, and spend less all at the same time. I am going to write about my grocery shopping process, the pros and cons of couponing, what to do when you can't afford organic, how to find the best prices, where you can save the most by making items homemade, and much more. I am really excited about this new shift in focus, and I feel like my blog will be much better for it. 

Now, speaking of saving money, I want to show you some amazing yard sale finds from today. Going to yard sales is a recent development for me. I have always been a major supporter of thrift stores, but for some reason I never frequented yard sales. I would see the sign reading 'Yard Sale" with an arrow pointing right and just drive on by. But not today. I checked on Craigslist this morning to find out if we had any local ones and headed out to explore. I also found a few unexpected ones from following signs that I saw driving on the main road. It was a blast and I am sad that the yardsaling season is about over. 


I started with $19, and I came away with 21 items. I found 2 Benjamin and Medwin cast iron pans, 2 purses, 1 brown ceramic serving plate, a pair of aeropostale skinny jeans with the tags on (they make my butt look fabulous :)), a pair of shorts, a toilet paper stand, 2 windows, and 11 books. I did some research once I got back and realized if bought new the total would have been over $300. The books alone would have cost over $90 even buying them used off amazon. Some interesting ones include 'Animal, Vegetable, Miracle - A Year of Food Life' by Barbara Kingsolver, a book of yoga poses, an autobiography of Paul Rusesabagina the man who inspired Hotel Rwanda, 'Real Christianity' by William Wilberforce, a book about spiritual warfare for women, 'This Present Darkness' and Piercing the Darkness' by Frank Peretti, and a french classic called 'The Red and the Black' by Stendhal. I am excited to dive into these amazing reads!


I am also super excited about these windows. The smaller one is a surprise project that I can't tell you about yet. The bigger one I am planning on mounting in the kitchen with each glass pane featuring a close up picture of the naturally vibrant and colorful foods that keep me passionate about eating healthy. I am thinking close ups of carrots, kiwi, jalapenos, tomatoes, grapefruit, etc... When it is finished and hanging on the wall, I want it to make my mouth water and inspire me to eat food the way God designed in its beautiful and delicious natural state. 

Friday, October 22, 2010

My Indecisive Blog

I was doing research last night about how to improve my blog, and be more a part of the blogging community. What I read made me stop and ponder. It left me with more questions than answers. It seems that I have been sitting on the sidelines and I need to refocus and and be more proactive to create the online community that I am looking for. I need to ask myself a few questions.

Why am I doing this?
There are many different reasons to have a blog, and each reason will create a different end product. When I started, I just wanted to have a place to post recipes. I also was looking for accountability. I have so many goals for everything. I was unfocused, and going nowhere, and I thought writing about them and making them public would give me more motivation to accomplish them. I realize that I am still unfocused in my blog. How do I define a focus when I have so many things I am interested in? Right now those things are healthy eating, saving money while being healthy, nutrition education, improving cooking skills, creating recipes, living simply and sustainably, fitness, and cultivating wellness in all areas of life. This brings me to my second question.

What makes me different?
There are so many blogs out there. There are countless healthy eating, living simply, organic, sustainable, money saving, and cooking blogs out there. What do I have to say that is different from everyone else? What I read last night said that once you figure out how you are unique, be consistent in your uniqueness. Nobody wants to follow someone who doesn't know where they are going. I know I have been really random in my writing style, and what I write about.

How am I marketing myself?
I also realize that I haven't been putting my name out there. I am one of those that read a bunch of other blogs but never comment. I think my first strategy is to comment more and be more friendly. I really do want to make friends with other bloggers, and being the one to initiate definitely helps :).

I want to hear from you. For those of you that read my blog, what are your thoughts? What do you want to read about? How can I improve my focus and my writing? What have you enjoyed and would like to see more of?

Thursday, October 21, 2010

Coconuts and Collards oh my

I am excited to share with you some of the great food I ate yesterday. I told you on Monday that I am going sugarless for ten days, and my goal is to try to eat more vegetables and balance out my cravings. It is going well and I believe yesterday was a great success. It included a lot of coconut and collard greens, and that makes me happy :).


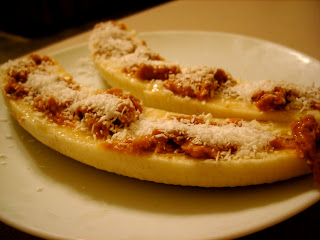
For breakfast I ate a banana sliced in half with natural peanut butter and unsweetened coconut. 

  
For lunch I ate summer rolls. They originated in Vietnam and the name literally means "mixed salad rolled". You can take whatever filling you want, with options including meat, sprouts, vegetables, rice noodles, and herbs. Then you wrap it up in a thin wrapper made out of rice, and is generally served with a dipping sauce. It is naturally gluten free, fresh tasting, and a meal I enjoy frequently. Yesterday I put avacado, cucumber, mushroom, carrot, and cilantro leaves in my summer rolls. I used a recipe for Spicy Mustard Green and Miso salad dressing that I found from Kim at Affairs of Living as my dipping sauce. I enjoyed the sauce on its own, but couldn't help myself and added some sriracha for good measure. This girl likes it spicy. :) I also cooked some collard greens in chicken broth to eat with my summer rolls. I loved how vibrant and green everything looked. It was a great balance of cooked and raw, hot and cold, spicy and soothing. Yum!


Last but definitely not least, for dinner last night I created a coconut lime peanut sauce. I based my idea off of the Thai Fresh Green Curry Sauce created by Ali at the The Whole Life Nutrition Kitchen. I played up with the ratios, and mixed up the ingredients. I was proud of myself for making this sauce. It had a variety of distinct flavors that stood out individually, yet married well to create something rich and complex. You first tasted the acidic lime juice, then the soothing coconut and rich peanut butter, then you got a kick from the fresh ginger, and finally you felt the heat from the Sriracha in the back of your throat as you finished the bite. Paired with steamed broccoli, leftover roasted chicken, and collard greens and served over quinoa. It was as nourishing as it was tasty. All I can say is that I was more than excited to have some leftover to be able to eat for lunch today. 

Coconut Lime Peanut Sauce:
1 lg clove garlic
1 Tablespoon lime juice, fresh squeezed
1 Tablespoon rice vinegar
2 Tablespoons natural peanut butter, crunchy or creamy
1 small bunch of cilantro
1 can full fat coconut milk
1 teaspoon Sriracha sauce 
1 inch fresh ginger,  peeled
3 Tablespoons of chicken broth or water
1/2 teaspoon salt
1/2 teaspoon pepper

Place all ingredients into a blender or food processor. Blend until creamy. Serve with steamed vegetables and quinoa or brown rice. 

This post is a part of Simple Lives Thursday hosted by GNOWFGLINS.


Monday, October 18, 2010

Say no to sugar

I have been going a little overboard on the sweets lately. It seems that once I have even a taste of something sweet it leaves me craving more. I even ate some of the peanut butter bars that I made for Chris yesterday that were filled will butter, sugar, and enriched bleached white flour. Ah. When I eat that stuff it makes me feel bloated, unsatisfied, and gives me a stomachache. When I do make the healthier snacks I tend to eat too much at a time. Like when I made pumpkin no bake cookies the other day and ate the whole batch by myself in a day and a half. 

I have decided that I need to take a little time to go without sweets. For the next ten days I will be avoiding sweeteners in my foods. Even my beloved raw honey and that delicious honey cherry jelly that I love to put on everything. I will try to focus on eating more vegetables and balancing out my cravings a little bit.  

So that means for the next ten days no more carrot cake...


No more chocolate nutty flax squares... 


And especially no more pumpkin no-bakes. 


But, I have many great recipes planned for this week to keep me away from wanting sweets. So check back soon :).

Saturday, October 16, 2010

The perfect gluten free tortilla

We have this ongoing debate at our house about tortillas. I like corn tortillas and Chris likes flour tortillas. I have made them both from scratch before, and Chris doesn't even like the homemade corn ones. Crazy, right? I was trying to find an alternative that is gluten free and corn free to try and compromise on our tortilla differences. 

Then I came across this incredible blog called Book of Yum that has gluten-free recipes from around the world. I love the passion that she has for other tastes and cultures, and I want to try so many of her recipes. She has a recipe for an indian roti or flat-bread made solely out of sorghum flour. Sorghum is a source of protein, calcium, and iron and naturally gluten free.

You can go and check out her blog and look up some of the great recipes at Book of Yum. To view her sorghum flat-bread tortilla recipe with detailed instructions click here


 The dough is made out of sorghum flour and water. The technique for this is similar to making a pastry dough. You start with boiling water, add half the flour stirring briskly with a whisk, then add the rest of the flour stirring in with a wooden spoon. It gets rubbery and forms a ball. This also kind of reminds me of how you make home-made playdough. 


Here my cooking setup. The dough is super easy to work with, and I just rolled each tortilla out in a plastic ziploc with the sides cut. I hear it is better to make them in a cast iron skillet, but I don't have one, and so my non-stick griddle pan worked just as well. 


They magically puff up in the middle. That's how you can tell you have a great flat-bread. 


My plate.
 I made pulled chicken, sauteed veggies, and salsa verde to go on our flatbread/tortillas with spanish rice. 
It was a great meal!


Chris' Plate.
 He ate his with sour cream. He said they still didn't taste like the store bought flour tortillas that he likes, but they were definitely preferable to corn. Hmm.. I think this compromise worked :). 


The recipe made quite a few tortillas so I ate a couple for breakfast the next day with natural peanut butter and cherry jelly. Then for dinner that same day I took two and spread them with the red pepper hummus I made the other day along with the leftover sauteed veggies from our fajitas. After toasting, the flat-bread was crunchy and the hummus completely worked with the pepper and onions. It was a delicious moment where an impromptu dinner decision resulted in a culinary masterpiece. I know that there will definitely be more hummus pizzas in my future and my mind is spinning with the infinite possibilities. Thank you Book of Yum for this amazing recipe that I know I will be making again soon.


Thursday, October 14, 2010

Pumpkin Oatmeal No Bakes (Gluten free, sugar free, dairy free)

Today has been another stressful day. I have been trying to apply for college to start classes spring semester.  My case is a little special because I was home-schooled and I also qualify as a non-traditional student; meaning it has been five years since I graduated high school and I don't have to submit SAT scores. I emailed the admissions office almost a month ago and asked them if I had to submit SAT scores because I was home-schooled and they said no. So I haven't been worried about it. I have submitted everything else and today I found out that I do indeed need to submit them because I was home-schooled. It is too late to take the test again to be able to still be accepted for the spring semester. So I called the SAT place and they will send my old scores, but they are in the archives and it will take them 2-4 weeks to find them and send them out. I don't know what to do, but I am going to be really disappointed if I can't start classes because of it. Any suggestions anyone?


In better news. I made some really great cookies today. You know I told you about those pumpkin cookies that I made last week. I wanted to make some adjustments and after my second attempt I think they are pretty darned good, and cute too :). I actually ran out of pumpkin, and I have been using acorn squash to experiment with. I don't know if that has made any difference. I will try again with pumpkin when I get some more and test that out.

The first time I tried to make them I put in cocoa powder to attempt a healthier chocolate no bake. I guess I didn't put enough sugar or other flavorings because it kind of just tasted like chocolate flavored acorn squash. I was okay with that, but I am pretty sure the majority of people wouldn't like it. This time I changed it up and made it a spiced cookie and let the flavor of the acorn squash, or pumpkin as the case may be, shine through. I liked them better after I had let them chill for a little while. Next time when I make them with pumpkin I might try adding some ginger. I bet that would be great! Feel free to play around with the spices and flavors to customize it to your taste!

Pumpkin Oatmeal No Bakes (gluten free, sugar free, dairy free)
Makes 16 Tablespoon size cookies

2 T coconut oil
1/4 cup honey
1/2 cup pumpkin or acorn squash puree
1/4 cup shredded unsweetened coconut
1 cup gluten free oats
1 tsp cinnamon
1/4 tsp nutmeg

Place oil, honey, puree, and spices into a small saucepan. Heat over medium heat until mixture is hot. It will be really thick. Add in coconut and oats and mix well. Scoop out Tablespoon size cookies onto a piece of parchment paper. Place in fridge or freezer to chill.

Wednesday, October 13, 2010

'Healthified' Chips and Dip

Do you ever have 'blah' days? I definitely do, and when I feel 'blah' I want to eat all the junk I can get my hands on. Yes, I am confessing to being an emotional overeater. Then I feel gross from eating too much which makes everything else worse and it is just not a good thing. I try not to keep much around the house that could be a temptation. But in desperate times my husband's Reese's Peanut Butter Ice Cream might get eaten because I just don't care. I am getting better at this, but it still happens sometimes, and today stinks. Thankfully I had planned on making crackers and boy did those crackers save me from that darned peanut butter ice cream in the freezer. 


I found this recipe for Whole Grain Cracker Bread from Kim at Affairs of Living. It calls for cooked quinoa, buckwheat flour, salt, sesame seeds, olive oil, and water. Lo and behold, I had leftover cooked quinoa in the fridge, and only had to sub in sorghum flour for the buckwheat and poppy seeds for the sesame. 


These crackers are so simple, they are gluten free, dairy free, sugar free, and you can find the recipe here.


To go with my cracker bread I made Roasted Red Pepper Hummus also from Kim's blog. Normally you need tahini (sesame seed paste) to make a true hummus and I didn't have any. I found this recipe that called for chickpeas (aka garbanzo beans), roasted red pepper, garlic, capers, olive oil, and lemon juice. What intrigued me most were the capers. I used to work at a bagel shop where we sold a sandwich called the Bagel and Lox. It was a bagel with cream cheese, capers, red onions, tomatoes, and smoked salmon. Once I tried it, it became my favorite sandwich, and I developed a fondness for capers. I happened to have a jar of capers in the fridge, and I thought they added a nice briny flavor to the hummus which I really enjoyed.


 It was simple, satisfying, and kept me from eating a bunch of stuff I would have regretted. Yay for healthy snacks :).

Sunday, October 10, 2010

My Ode to Pumpkin

Wow! It has been a great weekend! My wonderful friend Jessica M. came up for a few days, and we had a blast. We both share a love of nourishing food, finding bargains, making crafts, dancing, and so many more things. We cooked, we shopped at thrift stores and yard sales, and we went to a football game on Friday night. The only sad thing was we ran out of time to do everything we wanted to do together.

The first night she was here we baked up a pumpkin and experimented a bit. 


Jessica took the seeds and mixed them up with a little bit of brown sugar and cinnamon. We put them in the oven at 350 degrees for about 15 minutes, stirring every few minutes to make sure they cooked evenly. We took them out when they turned golden brown. 
These were the best pumpkin seeds I have ever eaten. They were slightly sweet and satisfyingly crunchy. Not too shabby for some chicks with zero pumpkin seed making experience.


 Second, we made pumpkin oatmeal cookies. They were extremely tasty. We only made half the batter on Thursday and I have to confess that I finished off the other half by myself today. Ah, it was that good.   Before I share the recipe with you though, I want to tweak it a little. We thought the batter tasted super rich, and even buttery even though there was no butter or oil in it. But after baking, it lost some of that great richness. I want to experiment making it a no-bake with some different techniques and ingredients. 

Finally, I say you are due for a story.
Jessica and I were eating apples. Yes, I am still working on the 25 lbs. of apples that I picked at the apple orchard in September. You have to realize that these apples have been in my fridge for almost 5 weeks now. Another thing you have to realize is that normally I eat the whole apple; seeds and all. 
I was running around the kitchen working on dinner and wasn't looking at what I was eating. I took a big bite through the middle and it tasted funny. I looked down at the apple and there was a worm wiggling in my face. Yes, I definitely screamed and did a silly dance in the middle of the kitchen that represented my shock and amazement. I can't believe that it has stayed alive so long. 
I guess you could say that this is the risk and the blessing of eating real food. Even though you may encounter more bugs or more dirt, the amazing thing is you know it is living and nutritious. I know that I will continue to eat real food, and continue to eat my whole apple. I will just look twice now before I bite into the middle of it. :)

Thursday, October 7, 2010

Lasagna Gardenening (My first attempt)

For those of you that know me, I have been talking about starting a garden for 2 months now. I was looking for a way to do it inexpensively, and I found out that time is the best resource you can have. I borrowed countless books from the library and read one about lasagna gardening. So I have decided to start a few lasagna beds that will be ready by next spring. The amazing thing about it is that you don't have to buy any soil. You can layer different matter and after it sits for a while you are rewarded with rich compost. 

To make my lasagna beds I bought four 2x4 foot raised beds at a recycling center for $2 a piece. 


I got newspaper from family, and the recycle bin at  my local grocery store. I soaked it in water and laid it out in each of my beds. It is to stop the grass and weeds from growing.


We have a local farm that raises pasture fed beef. I emailed them the other day, and they graciously let me come and shovel up 2 containers worth of manure for free.


We have been saving grass clippings from mowing the lawn in a pile at the edge of the property, and I also have a pile of food scraps that I have been saving. 


I had the dog out with me, and I thought he was going to be okay, but then he starting munching on a rotten banana peel and I had to take him inside. He is just so curious. :)


These are the finished beds. Or at least what I had the supplies for yesterday. These have a thick layer of newspaper, a layer of grass clippings, food scraps, manure, dead leaves, and a final layer of grass. I am going to get more manure, more grass, more leaves, and hopefully get some free coffee grounds from starbucks. I read that as it decomposes it settles down a lot, and so the ideal is to get it up to 24 inches. I am at 6 inches, so I have a ways to go. But thankfully, I live in GA and snow won't keep me from being able to add to it in the next couple of months as I get more supplies. 


So far I have spent $8 on my garden and I will be keeping track of how much I spend, and how much I save with the produce that I will gain from having a garden next year. 

Any suggestions on what I should grow??

This post is a part of Simple Lives Thursday hosted by Wardeh at GNOWFGLINS!

Tuesday, October 5, 2010

Roasted Cauliflower

I used to dislike cauliflower. It was always mushy, and tasteless. But recently I started roasting it in the oven, and I will never go back. It gets a bit crispy around the edges and still retains that satisfying crunch without being bitter. I love eating cauliflower this way. 


I made roasted cauliflower, baked tilapia, and polenta for dinner tonight. I thought it was super tasty. This post is for anyone that has sworn off of cauliflower. Maybe experience has led you to believe that it is a vegetable that is destined to become bland mush. But I am here to tell you that it can be made into something flavorful, crisp tender, and fabulous! The great news is that it is also in season right now. So grab a head a cauliflower on your next trip to the grocery store and roast away.

Roasted Cauliflower:
Serves 4-6 as a side dish

1 head of cauliflower
Olive oil
Salt and Pepper
Paprika

Preheat oven to 400 degrees.
Cut up one cauliflower and spread it out on a large pan. Drizzle with olive oil. Season with salt, pepper, and paprika to taste. Toss to coat evenly. Place in oven and roast 30 minutes.

Saturday, October 2, 2010

It's time to dance again.

This is our final pose for a dance we did at my old church.
 I am the one in the middle with the hat.

I had the morning to myself today and I didn't know what to do. Normally I have a whole list of things I need to get done and today I was drawing a blank. Well, maybe it was more like I didn't feel like doing what I needed to do, yet I didn't want to sit around and be lazy either. I get the most pleasure from being productive and getting something accomplished. Oddly enough, if I spend a whole day doing nothing I feel more drained than rested. I think I get this from my Mom :). 

I started by doing my devotions and journaling a little bit. Then a thought popped into my head. Why don't I ask God what He thinks I should do this morning? It is strange that I didn't think about that first, instead of waiting until I couldn't think of anything else. I am trying to be more intentional in my pursuit of God and I know I need grace to seek Him first. So many times I only think of Him when I need something from Him or can't think of anything else. He deserves way more than my leftovers. 

Then I heard Him say He wanted me to praise Him. He wanted me to dance for Him. 

I haven't danced in a long time. I have been interested in it for several years now, and it is something that brings me great joy. But, it seems that every time I have an opportunity to develop my dancing something comes in the way. I have let go of this passion way too easily, and I haven't fought to keep it alive. 

I felt like God way saying to me today that the love I have for dance is from Him. He planted the desire and passion in my soul and I am called to develop this gift. When I danced to worship God today it was like something opened up inside of me. Dancing truly brings me to life and I want to be faithful to use it for the Lord. 

There is a local ballet class held once a week that I can go to. But, because of finances I have been hesitant to sign up. Today God told me to have faith and believe that He will provide for what He's called me to do. :) I have such an awesome Heavenly Father that is always looking out for me.

 I guess it is time to get out my ballet shoes and start dancing again!